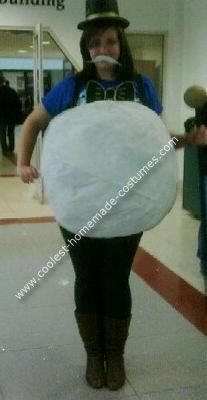
To make a snowball costume, start by folding a fabric in half and cutting out a circle shape. Then, cut out holes for your arms and head.
Next, stuff the fabric with filling or cotton to give it a fluffy appearance. Finally, sew or glue the openings together and add any additional details or accessories such as button eyes or a carrot nose.

Credit: kostumi.store
Materials Needed For Snowball Costume
To make a snowball costume, you will need fabric, scissors, glue, and felt for the eyes and mouth. Fold the fabric in half and cut out holes for the head and arms. Glue on the felt to create the face.
Simple and easy DIY project for a fun costume!
In order to make a snowball costume, you will need a few materials to bring your idea to life. Below is a list of the essential items you will need: |
White Fabric
The first material that you will need is white fabric. Opt for a fabric that is soft and fluffy, like fleece or cotton, to truly mimic the appearance of a snowball. Measure and cut the fabric according to your desired costume size.
Fiberfill Stuffing
To give your snowball costume the perfect round shape, you will need fiberfill stuffing. This material is lightweight and can be easily manipulated to create the desired volume. Begin by stuffing the white fabric with fiberfill to create a full and rounded snowball shape.
Needle And Thread
A needle and thread are essential for securing the edges of the white fabric together. Ensure that the thread matches the color of the fabric to create a seamless appearance. Use a strong and durable thread to ensure that the costume holds up throughout the day.
Scissors
Scissors are necessary for cutting the white fabric and trimming any excess material. It is important to have a sharp pair of scissors to ensure clean and precise cuts. Take your time when cutting the fabric to achieve the desired shape and size.
Elastic
Elastic will be used to secure the snowball costume around your body. Measure and cut a piece of elastic that fits comfortably around your waist or whichever area of the body the costume will be worn. The elastic should be snug enough to hold the costume in place but not too tight to cause discomfort.
Ribbon Or String
Adding ribbon or string to the costume can provide additional decorative elements or help with securing the costume in place. Consider using ribbon or string to create a belt-like feature around the waist to enhance the overall look of the costume.
Hot Glue Gun
A hot glue gun will come in handy for attaching any additional decorations to the snowball costume. Whether you want to add buttons, sequins, or other embellishments, a hot glue gun will securely fasten them to the fabric. Use caution when handling the hot glue gun to avoid burns.
Ensure that you have all of these materials before starting the snowball costume-making process. Having everything prepared will make the process smoother and more enjoyable.Creating The Snowball Base
To make a snowball costume, start by folding the fabric in half and cutting out the shape, using a t-shirt as a guide. Then, cut out the armholes and add stuffing to create a fluffy snowball look. Finally, stitch the edges together and you’re ready to go as a cute snowball!
When it comes to making a snowball costume, the first step you need to take is creating the snowball base. This is the foundation of your costume, and it’s important to get it right in order to achieve the desired look. Let’s break down the process into three steps: cutting the fabric, sewing it together, and stuffing it with fiberfill.
Cutting The Fabric For The Snowball Shape
The first thing you need to do is cut the fabric into the shape of a snowball. You can use a soft white fabric like fleece or felt for this. Start by measuring and marking the desired dimensions of your snowball on the fabric. Then, using a sharp pair of fabric scissors, carefully cut along the marked lines to create the snowball shape. Remember to leave some extra fabric around the edges for sewing.
Sewing The Fabric Together, Leaving An Opening For Stuffing
Once you have the fabric cut into the snowball shape, it’s time to sew it together. Take the two pieces of fabric and place them on top of each other, with the right sides facing inwards. Using a sewing machine or a needle and thread, sew along the edges of the fabric, leaving a small opening for stuffing. This opening will later be used to insert the fiberfill.
Stuffing The Fabric With Fiberfill
With the snowball base sewn together, it’s time to stuff it with fiberfill. Fiberfill is a soft polyester filling that will give your snowball costume its fluffy appearance. Start by gently pushing small handfuls of fiberfill through the opening in the fabric, evenly distributing it throughout the snowball. Continue adding fiberfill until the snowball is plump and has the desired shape and texture.
Closing The Opening With Needle And Thread
Finally, to complete the snowball base, you need to close the opening. Thread a needle with a thread that matches the color of the fabric, and carefully sew the opening shut using small, neat stitches. Make sure to secure the thread at both ends to ensure the opening is completely closed and the fiberfill stays in place. Once the opening is closed, your snowball base is complete and ready for the next steps in creating your snowball costume.
Adding Details To The Snowball Costume
Once you have constructed the basic shape of your snowball costume, it’s time to add some fun and creative details to make it truly stand out. Adding facial features, arms, and a hat can elevate your costume and make it even more realistic. Let’s dive into the step-by-step process of adding these details to your snowball costume.
Crafting The Face Of The Snowball
First, you’ll want to craft the face of your snowball costume. Begin by cutting out eye and mouth shapes from felt or fabric. Use bold and black colors to create a contrast against the white snowball. For the eyes, circles or ovals work well, while a simple curve or smiley shape can serve as the mouth. Be sure to cut them out in appropriate sizes, considering the dimensions of your snowball costume.
Cutting Out Eye And Mouth Shapes From Felt Or Fabric
Next, use a pair of fabric scissors to carefully cut out the eye and mouth shapes from the chosen felt or fabric. Make clean and precise cuts to ensure accurate shapes that fit well on your snowball costume. Remember, safety always comes first, so be cautious while using sharp scissors.
Gluing Or Sewing The Facial Features Onto The Snowball
Once you have cut out the eye and mouth shapes, you can either glue or sew them onto the snowball. If you prefer a more permanent attachment, sewing is the way to go. Use a needle and thread to secure the facial features in place. Alternatively, if you want a quick and easy solution, using fabric glue or a hot glue gun can do the trick. Just be sure to follow the manufacturer’s instructions and apply the glue evenly for a secure hold.
Adding Arms To The Snowball Costume
To give your snowball costume some dimension, adding arms is a great idea. Begin by cutting arm shapes from white fabric. Measure the desired length based on your personal preference and the overall size of the snowball. Remember to cut them in appropriate proportions, keeping in mind the size of your costume.
Cutting Arm Shapes From White Fabric
Using fabric scissors, carefully cut out the arm shapes from the chosen white fabric. Make sure the edges are neat and clean to ensure a polished look once the arms are attached to the snowball costume.
Sewing Or Gluing The Arms Onto The Snowball
Once you have cut out the arm shapes, you can either sew or glue them onto the snowball. Sewing provides a secure and durable attachment. Use a needle and thread that matches the color of the fabric and carefully sew the arms onto the snowball at the desired position. Alternatively, if you prefer a quick and easy method, fabric glue or a hot glue gun can be used. Apply the glue evenly along the edges of the arms and press them firmly onto the snowball. Allow the glue to dry completely before handling the costume.
Creating A Hat For The Snowball Costume
To complete the look of your snowball costume, a hat is an essential addition. Begin by measuring the head of the person who will be wearing the costume and cut a piece of fabric accordingly. Make sure to leave some extra fabric for seam allowance.
Measuring The Head And Cutting Fabric Accordingly
Using a measuring tape, measure the head circumference and write down the measurement. Transfer the measurement onto the fabric and cut it out, leaving enough room for seam allowance. This ensures a well-fitting hat that sits comfortably on the wearer’s head.
Sewing Or Gluing The Fabric Into A Hat Shape
To turn the fabric into a hat shape, you can either sew or glue the edges together. Sewing provides a more secure hold and a professional finish. Use a sewing machine or hand sew the edges, ensuring they are firmly joined together. Alternatively, fabric glue can be used for a quick and easy solution. Apply the glue along the edges, press them together, and allow the glue to dry completely before wearing the costume.
Attaching Elastic Or Ribbon To Secure The Costume
Finally, to secure the snowball costume, attach elastic or ribbon to ensure a snug fit. Measure the length needed to go around the wearer’s waist or shoulders, depending on the placement of the costume, and cut the elastic or ribbon accordingly. Sew the ends securely onto the inside of the costume or use fabric glue to attach them, ensuring a comfortable and secure fit.
Decorating The Snowball Costume
Once you have created the base of your snowball costume, it’s time to add some playful and creative decorations to bring your costume to life. Decorating the snowball costume allows you to personalize it and make it unique. Here are some ideas on how you can add embellishments to your snowball costume:
Adding Embellishments To The Snowball Costume
Embellishments are a great way to add texture and visual interest to your snowball costume. Consider gluing on pom-poms or buttons to create a textured look. You can choose different sizes and colors to create a whimsical effect. Sewing them on is also an option if you want extra durability.
Gluing On Pom-poms Or Buttons For A Textured Look
For a fun and textured appearance, glue pom-poms or buttons directly onto your snowball costume. This will give your costume a playful and three-dimensional effect. Simply apply glue to the back of each pom-pom or button and adhere them to the surface of your costume. Arrange them in a pattern or scatter them randomly to create your desired look.
Using Fabric Markers To Draw Snowflake Patterns
Another way to decorate your snowball costume is by using fabric markers. These markers are designed for use on fabric and allow you to draw intricate patterns and designs. Use white fabric markers to draw snowflake patterns on the surface of your costume. You can create a variety of unique snowflake designs, ranging from simple to intricate. Let your creativity shine and make your snowball costume stand out!
Attaching Faux Fur Or White Feathers For A Realistic Effect
To achieve a realistic snowball effect, consider attaching faux fur or white feathers to your costume. These materials will give your costume a soft and fluffy appearance, resembling real snow. You can trim the faux fur or feathers into small pieces and glue them onto areas of the costume, such as the edges or neckline. This will add depth and bring your snowball costume to life.
In conclusion, decorating the snowball costume is a fun and creative process. Adding embellishments such as pom-poms or buttons, using fabric markers to draw snowflake patterns, and attaching faux fur or white feathers are just a few examples of how you can personalize your costume. Let your imagination guide you as you transform your snowball costume into a unique and eye-catching ensemble.
Putting On The Snowball Costume
Create your own Snowball costume with these easy steps: Fold fabric in half, and cut out sleeves and holes for your arms. Add white stuffing to create a round, snowball-like shape. Finish by adding black buttons and a top hat for the perfect snowman look.
Putting The Completed Costume On
Now that you have successfully completed making your snowball costume, it’s time to put it on and become the life of the party! Follow these steps to ensure a seamless and comfortable fit:
Slipping The Snowball Base Over The Head
Begin by carefully sliding the snowball base over your head. Make sure it is positioned properly, allowing for clear visibility through the eye holes. To avoid any damage to the costume or discomfort, take your time and be gentle when pulling the base down.
Adjusting The Elastic Or Ribbon For A Comfortable Fit
Once the snowball base is securely in place, it’s time to adjust the elastic or ribbon according to your preference. If your costume has an elastic band, stretch it slightly to fit comfortably around your head. If it has a ribbon, tie it snugly under your chin or at the back of your head. This will ensure that the costume stays in place throughout the festivities.
Tips For Wearing The Snowball Costume
To make the most of your snowball costume and have a memorable experience, keep the following tips in mind:
- Avoid excessive movement to prevent losing any decorations: While the snowball costume is undoubtedly eye-catching, it is important to remember that it may have delicate decorations that can fall off if you move too vigorously. Take care to avoid unnecessary rough movements to keep your costume intact.
- Use caution when walking to maintain balance: The snowball costume may add some bulk and alter your balance slightly. To ensure you stay steady, take smaller steps and be mindful of your surroundings. This will ensure that you have a comfortable and enjoyable time at the event.
Frequently Asked Questions On How To Make A Snowball Costume?
How To Make A Snowman Costume?
To make a snowman costume, fold fabric in half and cut into a t-shirt shape. Cut out armholes and a hole for the head. Attach buttons and stick on felt eyes, nose, and mouth. Add a hat and scarf for extra flair.
Voila, a snowman costume!
How Do You Make Pig Ears And Tails?
To make pig ears and tails, start by cutting out ear shapes from pink felt or fabric. Attach them to a headband or a hat. For the tail, cut out a long strip of pink fabric and sew or glue it together.
Attach the tail to the back of pants or a skirt.
How Do I Make My Halloween Costume Warmer?
To make your Halloween costume warmer, layer thermal leggings, tank tops, and undershirts underneath. Add long gloves for extra warmth and incorporate a hat or wig into the costume. Choose a costume that allows for the addition of layers and consider wearing a clear poncho or cape in case of rain.
How To Make An Ice Cream Costume For Kids?
To make an ice cream costume for kids, you can start by cutting fabric in the shape of an ice cream cone and sewing it together. Then, cut out felt shapes to represent different ice cream flavors and attach them to the cone.
Finally, add some colorful pom-poms as sprinkles.
Conclusion
To create a snowball costume, start by gathering materials like a white sweatshirt, white fabric or batting, and scissors. Cut the fabric or batting into various-sized circles and attach them to the sweatshirt using fabric glue or safety pins. Add finishing touches by wearing white pants and shoes, and voila! You have a creative and DIY snowball costume that will surely stand out at any costume party.
Have fun and get ready to be the center of attention in this unique and adorable snowball costume.