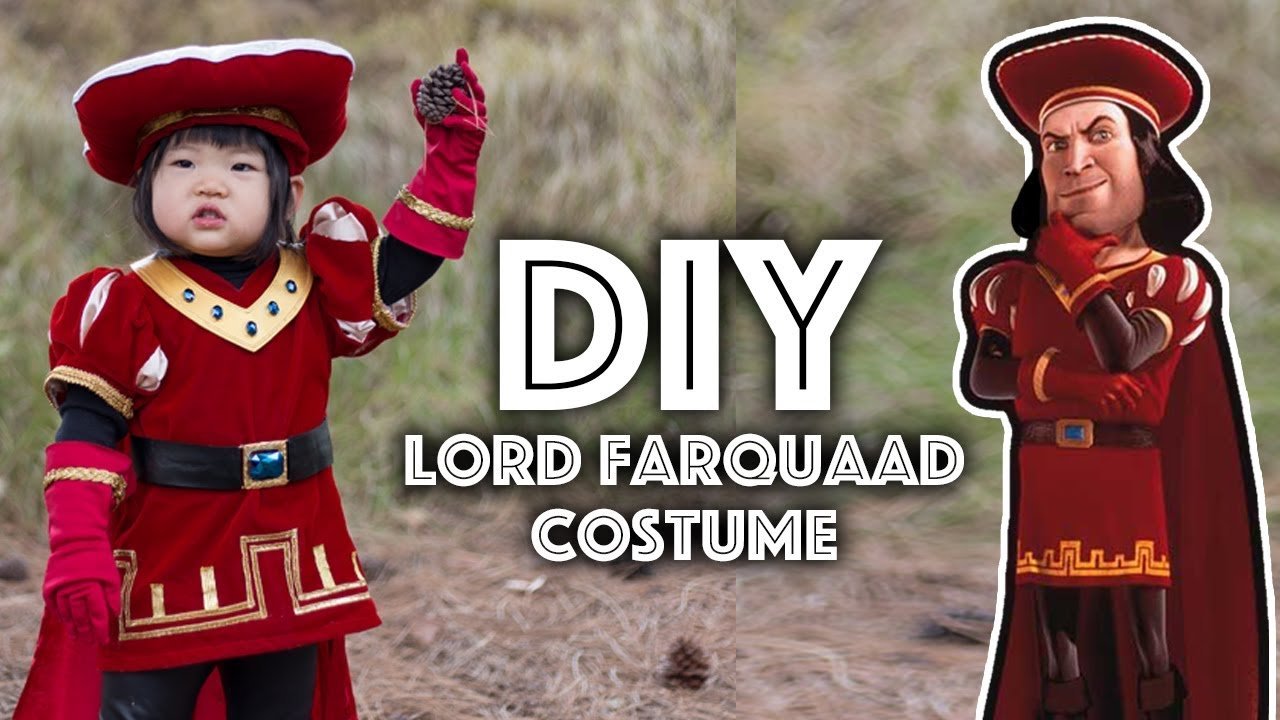
To make a Lord Farquaad costume, you can DIY by following online guides and tutorials. Dress like Lord Farquaad by getting a red cape, a knight uniform, a hat, a belt, boots, gloves, a black wig, and makeup.
There are also options available for purchasing Lord Farquaad costumes and accessories online.
Materials Needed
To make a Lord Farquaad costume, you’ll need a red hat with a cape, a knight uniform, a black robe, a black wig, and boots. Dress like Lord Farquaad with these essential materials.
Red Hat
For the iconic Lord Farquaad look, start with a red hat. This hat should have a flat top and a wide brim. You can find one at a local costume store or online.
Cape
Next, you’ll need a cape to complete the regal look. Look for a black or dark purple cape with a high collar. The length of the cape should fall just below your waist.
Robe
The robe is an essential piece of the Lord Farquaad costume. Opt for a floor-length robe in a royal color such as red, purple, or black. The fabric should have a luxurious look and feel, such as velvet or satin.
Knight Uniform
To get the knightly appearance for Lord Farquaad, you’ll need a knight uniform. Look for a tunic or shirt in a rich color like deep red or royal blue. Pair it with matching pants and boots to complete the ensemble.
Gloves
To add a touch of elegance to your costume, don’t forget to wear gloves. Choose black or dark-colored gloves that reach the wrists. This accessory will give your Lord Farquaad costume a polished and sophisticated look.
Now that you have the list of materials needed, you’re ready to start creating your Lord Farquaad costume. Gather these items and follow the step-by-step instructions to bring this beloved fairytale character to life.
Step 1: Creating The Hat
One of the iconic features of Lord Farquaad’s costume is his tall red hat. To bring this character to life, you’ll need to create a hat that matches his distinctive style. Here’s how you can make your own Lord Farquaad hat:
Measure Head Size For The Red Hat
Before you start making the hat, it’s important to measure your head size to ensure a proper fit. Here’s a simple guide to help you measure your head:
- Take a tape measure and wrap it around the widest part of your head, just above your ears and eyebrows.
- Make a note of the measurement in inches or centimeters.
Cut Fabric And Sew It Into A Hat Shape
Now that you have the measurements, it’s time to cut the fabric and sew it into the shape of the hat. Here’s a step-by-step process to guide you:
- Gather red fabric that is sturdy and has some stiffness to hold the shape of the hat.
- Using your measurement from earlier, determine the height and circumference needed for the hat. Add a few extra inches for seam allowance.
- Mark the measurements on the fabric and use a pair of fabric scissors to carefully cut out the hat shape.
- Next, fold the fabric in half with the right sides facing each other, and pin the edges together to secure them.
- Using a sewing machine or a needle and thread, sew along the pinned edges, leaving the bottom open.
- Once you’ve sewn the sides, turn the fabric right side out, and you’ll have the basic shape of the hat.
- If you want to create the signature pointy tip of Lord Farquaad’s hat, you can stuff it with polyfill or another lightweight material.
Congratulations! You’ve successfully completed the first step of creating a Lord Farquaad costume by making the hat. Now you can move on to the next steps to complete the rest of the costume.
Step 2: Making The Cape
One of the most iconic parts of Lord Farquaad’s costume is his cape. It adds an air of regality and completes the look. In this step, we will guide you through the process of making the cape for your Lord Farquaad costume.
Measure For The Length Of The Cape
Before cutting any fabric, you need to determine the appropriate length for the cape. To do this, measure from the base of your neck to your desired cape length. Take note of this measurement, as it will be crucial in the next steps.
Cut Fabric And Sew It Into A Cape Shape
Now, it’s time to cut the fabric and transform it into a cape shape. Measure the desired width of the cape by extending your arms out and determining how wide you want it to be. Add a few inches to this measurement for seam allowances.
Using these measurements, cut the fabric into a rectangular shape, with the length being the measurement you took earlier and the width being the desired width plus seam allowances.
Once you have your fabric cut, sew the sides together, creating a seam on both sides. This will form the basic shape of your cape.
Attach Fasteners To Secure The Cape Around The Neck
To ensure your cape stays securely in place, you will need to attach fasteners around the neck. You can use hook and loop fasteners or snaps for this purpose.
Measure the circumference of your neck and cut a piece of hook and loop fastener or snap tape to that length. Sew one side of the fastener tape onto the inside of the cape, near the top edge. Then, sew the matching side onto the outside of the cape, aligning it with the first piece.
When wearing the costume, simply wrap the cape around your neck and fasten the tape securely, allowing the cape to drape elegantly.
With these simple steps, you can easily create a cape for your Lord Farquaad costume. Now, your costume is truly coming together, and you’re one step closer to becoming the regal ruler of Duloc!
Step 3: Sewing The Robe
Learn how to make a Lord Farquaad costume by following step 3: sewing the robe. Get detailed instructions and tips for creating the perfect costume for your next Shrek-themed event.
Now that you have measured and cut the fabric for your Lord Farquaad costume, it’s time to sew the pieces together and create the robe. Follow these simple steps to bring your costume to life:
Measure And Cut Fabric For The Robe
- Spread out the fabric on a flat surface, ensuring it is wrinkle-free.
- Measure and mark the desired length for your robe using a ruler or measuring tape.
- Using fabric scissors, carefully cut along the marked lines to separate the robe pieces.
Sew The Pieces Together To Create The Robe
Now that you have the separate pieces of the robe, it’s time to sew them together:
- Start by pinning the front and back pieces of the robe together at the shoulders, right sides facing each other.
- Using a sewing machine or needle and thread, stitch along the pinned edges, creating a secure seam.
- Repeat the same process for the sides of the robe, pinning and sewing the edges together.
- Once the sides are sewn, hem the bottom edge of the robe by folding it over and stitching it in place.
Add Any Desired Embellishments To The Robe
Now that you have the basic robe, you can add some extra touches to make it resemble Lord Farquaad’s costume:
- Consider adding gold trims or ribbon along the edges of the robe to give it a regal look.
- You can also sew on faux fur or velvet trim to the collar and cuffs for added authenticity.
- Don’t forget to attach any required embellishments, such as buttons or patches, to complete the look.
Once you have completed these steps, your Lord Farquaad robe will be ready to wear and impress at any costume party or event. Pair it with the other elements of the costume, such as the hat and tights, to fully embody the character. Get ready to step into the magical world of Shrek and make a statement with your DIY Lord Farquaad costume!
Step 4: Designing The Knight Uniform
Designing the knight uniform is the fourth step in creating a Lord Farquaad costume. From cutting the dress to adding the cape, this process involves attention to detail to achieve an authentic knight’s look.
When it comes to creating a Lord Farquaad costume, the knight uniform is an essential part of the ensemble. To design the perfect knight uniform, you’ll need to follow a few simple steps. In this step-by-step guide, we’ll walk you through the process of measuring and cutting the fabric, sewing the pieces together, and adding any desired embellishments to bring your knight uniform to life.Measure And Cut Fabric For The Knight Uniform
To start, you’ll need to measure and cut the fabric for your knight uniform. Here’s a breakdown of the process:- Measurements: Take accurate measurements of your chest, waist, hips, and desired length for the uniform. Write down these measurements for reference.
- Fabric selection: Choose a sturdy, breathable fabric in a color that matches your vision for the costume. Heavy cotton or twill are excellent choices for a knight uniform.
- Cutting the pieces: Lay out your fabric on a flat surface and use a measuring tape and fabric scissors to cut out the necessary pieces for the uniform. This includes the front and back panels, sleeves, collar, and any additional components such as a cape or sash.
Sew The Pieces Together To Create The Uniform
Once you have all the fabric pieces cut out, it’s time to sew them together. Follow these steps to assemble your knight uniform:- Pin the pieces: Lay out the fabric pieces according to the pattern or design you want and use straight pins to hold them together.
- Seam allowance: Set your sewing machine to the appropriate stitch setting and sew along the edges, leaving a small seam allowance. Be sure to reinforce stress points like the shoulders or seams.
- Fitting: Try on the uniform as you go to ensure a proper fit. Make any necessary adjustments by trimming seams or taking in or letting out fabric as needed.
- Finishing touches: Hem the edges, sew on buttons or fastenings, and add any additional details like decorative topstitching or trim to complete the look of your knight uniform.
Add Any Desired Embellishments To The Uniform
- Embroidery: Use contrasting thread to add intricate embroidery designs to the collar, cuffs, or hemline of the uniform.
- Embellishments: Sew on decorative patches, appliques, or trim, such as gold braid or silver studs, to give your uniform a regal flair.
- Accessories: Complete the knight look by adding a belt with a decorative buckle or wearing a cape with a coordinating color or pattern.
Step 5: Creating The Gloves
Once you have assembled the main components of your Lord Farquaad costume, it’s time to move on to Step 5: Creating the Gloves. The gloves are an important accessory that complete the overall look of the character. In this step, we will guide you through the process of measuring your hand size, cutting fabric, sewing it into glove shapes, and adding any desired details or decorations.
H3measure Hand Size For The Gloves/h3
The first step in creating the gloves for your Lord Farquaad costume is to measure your hand size. This will ensure that the gloves fit you perfectly. To measure your hand size, follow these simple steps:
- Place a soft measuring tape around the widest part of your hand, which is usually around the knuckles.
- Make sure the tape is snug but not too tight, as you want the gloves to be comfortable to wear.
- Take note of the measurement in inches or centimeters.
H3cut Fabric And Sew It Into Glove Shapes/h3
Now that you have your hand size measurements, it’s time to cut the fabric and sew it into glove shapes. Follow these steps:
- Choose a fabric that matches the color of your Lord Farquaad costume. Synthetic fabrics like spandex or stretchy materials work well for gloves.
- Using your hand size measurements, create a pattern for the gloves by drawing the outline of your hand onto a piece of paper.
- Transfer the pattern onto the fabric and cut out the glove shapes, making sure to leave a seam allowance for sewing.
- With right sides facing each other, stitch along the edges of the glove shapes using a sewing machine or hand sewing needle.
H3add Any Desired Details Or Decorations To The Gloves/h3
After sewing the fabric into glove shapes, you can add any desired details or decorations to enhance the look of your Lord Farquaad costume. Here are some ideas:
- Attach small, decorative buttons or beads to the gloves to mimic the appearance of Lord Farquaad’s gloves.
- Use fabric paint or markers to draw intricate designs on the gloves, such as the intricate patterns seen on Lord Farquaad’s gloves in the movie.
- Consider adding faux fur or trim along the edges of the gloves to give them a more regal and luxurious look.
Remember to be creative and have fun with the design process. The gloves are an opportunity to add your personal touch to the Lord Farquaad costume and make it unique.
Step 6: Assembling The Costume
Step 6: Assembling the Costume is an essential part of creating your Lord Farquaad costume. Follow the detailed instructions to bring your costume to life and impress everyone at your next Halloween party or cosplay event.
Now that you have all the individual pieces of your Lord Farquaad costume ready, it’s time to put it all together. Follow these steps to assemble the perfect Lord Farquaad costume and bring the character to life.Put On The Red Hat
Start by putting on the iconic red hat that Lord Farquaad is known for. This hat is an essential part of his costume and will instantly help you resemble the character. Place the hat on your head, making sure it sits securely and comfortably.Wear The Robe, Cape, And Knight Uniform
Next, put on the robe, cape, and knight uniform in the correct order. Begin by wearing the robe, which generally falls below the knee. Ensure that the robe is straight and buttoned or tied securely. Layer the cape over the robe, letting it flow gracefully down your back. Finally, put on the knight uniform, which typically consists of a tunic and tights. Adjust the uniform so it fits snugly but comfortably.If you want to add additional authenticity to the costume, consider incorporating Lord Farquaad’s signature armor pieces, such as a chest plate or shoulder armor. These accessories can help complete the look and make your costume stand out.Put On The Gloves To Complete The Costume
To finish off your Lord Farquaad costume, put on a pair of gloves. Lord Farquaad is often seen wearing gloves, so this accessory is crucial for achieving an accurate portrayal of the character. Slip on the gloves and adjust them so they fit securely and comfortably on your hands.Once you have assembled all the pieces of your Lord Farquaad costume, take a moment to ensure everything is in place and looks just right. Stand tall, embody the character’s confident posture, and get ready to showcase your Lord Farquaad costume with pride!Remember, attention to detail is key when it comes to creating an authentic Lord Farquaad costume. By following these steps and putting together each element meticulously, you’ll be ready to impress everyone with your Lord Farquaad look. Have fun and enjoy transforming yourself into this iconic Shrek character!
Credit: www.pinterest.com
Frequently Asked Questions Of How To Make A Lord Farquaad Costume?
How Do You Dress Like Lord Farquaad?
To dress like Lord Farquaad, you will need a bodysuit, king robe, longline t-shirt, renaissance hat, dress belt, cosplay boots, cosplay gloves, and a black wig. It’s like a catcher’s uniform with puppet legs connected.
How Do You Make Lord Farquaad’s Hat?
To make Lord Farquaad’s hat, you can follow these steps:1. Start with a red, tall and pointed hat. 2. Add a white trim at the base of the hat. 3. Attach a gold or yellow band around the middle of the hat.
4. Optionally, add a black feather or plume on the side of the hat. By following these steps, you can create a DIY Lord Farquaad hat for your costume.
How Does Lord Farquaad Costume Work?
The Lord Farquaad costume consists of a catcher’s uniform with puppet legs attached to it. It allows the wearer to move and dance on their knees, making it an impressive and unique costume.
What Color Pants Does Shrek Wear?
Shrek wears green pants.
Conclusion
To create your own Lord Farquaad costume, follow these simple steps. Start by finding a longline t-shirt, a Renaissance hat, and a black wig. Then, add a king robe, a dress belt, and cosplay boots to complete the look. Don’t forget the cosplay gloves for an extra touch.
If you want to go all out, you can even make a mascot head using cardboard and paint. With these tips, you’ll be able to embody the iconic Lord Farquaad character from Shrek and impress everyone at your next costume event.
Get ready to slay Halloween in style!