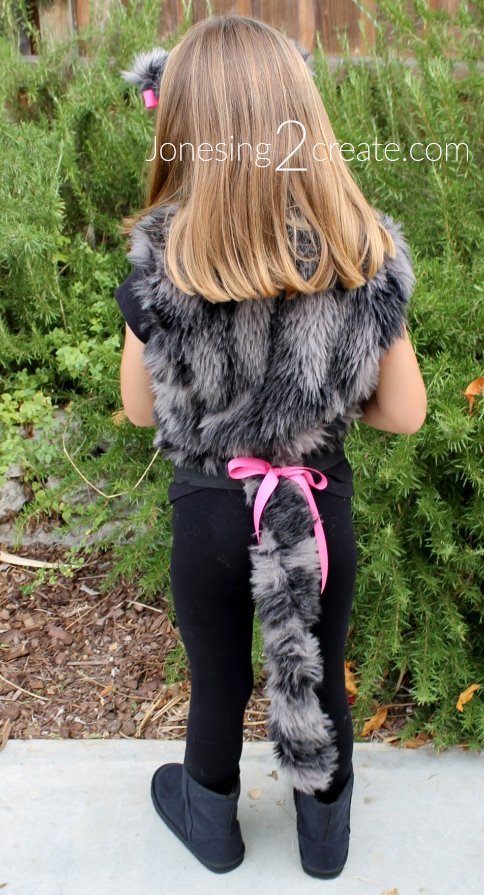
To make a cat tail costume, simply cut out a piece of fabric to the desired length and width, fold it in half with the right sides together, and sew the short and long sides together. Then, wrap a wire hanger in fuzzy furry feather material and hot glue it into place, creating a fluffy tail.
Let’s learn in-depth about how to make a cat tail costume.
How To Make A Cat Tail Costume: Materials Needed
When it comes to creating a cat tail costume, you’ll need a few key materials to bring your feline-inspired look to life. Whether you’re making the costume for yourself or for someone else, gather the following items before getting started:
Fabric
Choosing the right fabric is essential for creating a cat tail that is both durable and comfortable. Opt for a fabric that matches the color and texture you desire for your costume. Faux fur or felt are popular choices for cat tails, as they provide a realistic look and feel.
Scissors
A good pair of scissors is essential for cutting the fabric to the desired length and shape. Make sure to use a sharp pair that can easily cut through the chosen material.
Needle And Thread
If you’re comfortable with sewing, a needle and thread will be necessary to secure the fabric layers together. Use a thread that matches the color of the fabric to create a seamless finish.
Elastic
Elastic is a crucial component when it comes to attaching the cat’s tail to your costume. Choose a strong, stretchy elastic band that securely holds the tail in place.
Stuffing
To give your cat’s tail a full and fluffy appearance, stuffing is a must-have. Use a soft, lightweight material, such as polyester fiberfill, to stuff the tail and achieve the desired shape.
Safety Pins
Extra safety pins are useful for securing the tail to your costume. Make sure to use closed safety pins to avoid any accidental pokes while wearing the costume.
Step 1: Measure And Cut The Fabric
To make a cat tail costume, measure and cut the fabric to your desired length. This step-by-step guide will show you how to create a cat tail without sewing, making it a simple and easy DIY project.
Step 1: Measure The Length And Width Of The Desired Tail
Making a cat tail costume is a fun and creative way to dress up for Halloween or themed parties. Follow these simple steps to create your cat tail costume without sewing.
To start, measure the length and width of the tail you want your costume to have. This will help you determine the dimensions of the fabric you’ll need to cut.
Step 2: Cut The Fabric According To The Measurements
Once you have determined the length and width of your desired cat tail, it’s time to cut the fabric. Choose a fabric that matches the color you want for your cat’s tail, such as black or brown. Lay the fabric out on a flat surface and mark the measurements you took in step 1. Use a ruler or measuring tape to ensure accuracy.
| Step 2: Cut the fabric according to the measurements | |
|---|---|
| Length | Width |
| Measure the desired length of the tail on the fabric. | Measure the desired width of the tail on the fabric. |
| Cut along the marked length of the fabric, creating a long strip. | Cut along the marked width of the fabric, creating the shape of the tail. |
After marking the measurements on the fabric, use scissors to cut along the marked lines carefully.
Make sure to cut smoothly and evenly to create a clean shape for your cat’s tail. Once you have cut out the tail shape, you can move on to the next step of attaching it to your costume.
Creating a cat-tail costume doesn’t have to be a complicated or time-consuming process. By following these steps and using a no-sew approach, you can easily make your own cat tail costume that is both fun and comfortable to wear.
Stay tuned for the next steps in this series, where we will cover how to attach the fabric tail to your costume and add the finishing touches for a perfectly fantastic result!
Step 2: Sew The Tail
To make a cat tail costume, start by sewing the tail using fabric the length you desire and twice as wide. Follow a simple step-by-step guide to create a tail without sewing, using tights instead.
Step 2: Sew the Tail
You will need to sew the fabric together to create a realistic and adorable cat tail for your costume. Follow these simple steps to bring your cat’s tail to life:
Fold the fabric in half, with the right sides facing each other.
Start by taking your chosen fabric and folding it in half, ensuring that the right sides are facing each other. This will create a double layer of fabric that will make your cat’s tail more sturdy and durable.
Sew along the long side, leaving one end open.
Using a sewing machine or a needle and thread, sew along the long side of the fabric, starting from the open end and moving towards the folded end. Make sure to leave one end open, as this is where you will stuff the tail later on.
Turn the fabric right side out.
Once you have sewn along the long side, carefully turn the fabric right side out so that the seam is hidden on the inside of the tail. This will create a clean and polished look for your costume.
Now that you have sewn your cat’s tail, you are ready to move on to the next step: attaching it to your costume. Stay tuned for our next blog post where we will show you how to secure the tail and complete your cat tail costume.
Step 3: Add Elastic
To make a cat tail costume, step 3 involves adding elastic. This helps to securely attach the tail to your costume without the need for sewing. Follow the step-by-step guide to create your own cat tail costume.
Step 3: Add Elastic
To ensure your DIY cat tail costume fits comfortably and stays in place while you’re wearing it, you’ll need to add elastic. Follow these simple steps to incorporate elastic into your cat tail costume:
Measure and cut a piece of elastic that fits around your waist.
First, you’ll need to measure your waist to determine the length of elastic needed. Use a tape measure to measure around your waist and cut a piece of elastic that matches this measurement. Make sure the elastic is not too tight or too loose, as you want it to fit comfortably around your waist.
Insert the elastic into the open end of the tail.
Next, take the open end of the tail and carefully insert the elastic into it. You may need to stretch the elastic slightly to fit it through the opening. Once the elastic is inside the tail, make sure it is evenly distributed along the length of the tail.
Sew the end of the tail closed, securing the elastic in place.
Using a needle and thread, sew the end of the tail closed to secure the elastic in place. Start by folding over the fabric at the end of the tail, enclosing the elastic within it. Then, sew along the folded edge, making sure to create secure and tight stitches. This will ensure that the elastic stays in place and the tail remains securely attached to your waist.
By following these simple steps, you can easily add elastic to your cat tail costume, creating a comfortable and secure fit. Now that the elastic is in place, your cat tail costume is ready to be worn and enjoyed!
Step 4: Stuff The Tail
To stuff the tail for your cat costume, cut out a piece of fabric the desired length and twice as wide. Fold it in half, and sew around the edges, leaving a small opening. Fill the tail with stuffing, sew the opening shut, and attach it to your costume.
The next step in making your cat tail costume is to stuff the tail. This will give it a fluffy appearance and make it look more realistic. Here’s how you can do it:
Use Stuffing To Fill The Tail, Creating A Fluffy Appearance.
To start, you’ll need some stuffing material. You can use polyfill or cotton batting, whichever you prefer. Make sure the stuffing is soft and lightweight, as this will make the tail more comfortable to wear.
Begin by opening up the tail and positioning it on a flat surface. Take handfuls of the stuffing material and start filling the tail, starting from the base and working your way towards the tip. Use your fingers to push the stuffing towards the edges, ensuring an even distribution throughout the tail.
As you continue to stuff the tail, gently shape it with your hands to create a natural curve. You can experiment with the thickness of the stuffing to achieve the desired shape and volume.
Adjust The Amount Of Stuffing To Achieve The Desired Shape And Volume.
It’s important to adjust the amount of stuffing as you go along to ensure the tail looks just right. If you want a more slender and sleek tail, use less stuffing. If you prefer a thicker and fuller tail, add more stuffing. You can also play around with the shape by changing the distribution of the stuffing within the tail.
Once you’re satisfied with the shape and volume of the tail, secure the opening by stitching it closed. Make sure the stitching is secure and reinforced to prevent any accidental unraveling.
And there you have it – a perfectly stuffed cat tail for your costume. This step brings your cat tail costume to life by giving it that realistic and fluffy appearance. Now you’re ready to move on to the next step and complete your cat costume!
Step 5: Attach The Tail
Now that you have successfully created a cat tail for your costume, it’s time to attach it to your pants or skirt. Follow these simple steps to ensure that the tail is secure and comfortable:
Use Safety Pins To Attach The Tail To The Back Of Your Pants Or Skirt.
To start, take your cat’s tail and position it at the back of your pants or skirt where you want it to be. Then, grab some safety pins and use them to attach the tail to the fabric. Make sure to place the pins in a way that they are hidden and won’t be easily visible.
Make Sure The Tail Is Secure And Comfortable.
After attaching the tail with safety pins, take a moment to check if it is secure and won’t easily come off during your Halloween festivities. Gently tug on the tail to ensure it’s firmly attached. If you find any loose areas, simply adjust the pins to make it more secure.
Additionally, ensure that the tail is comfortable to wear. If you feel any discomfort or pulling on the fabric, try repositioning the pins or adjusting the placement of the tail. It’s important to feel comfortable and confident in your cat tail costume.
Once you have successfully attached and secured the tail, you’re ready to complete your cat costume. Remember to have fun and embrace your inner feline!
Step 6: Customize The Tail
To make a cat tail costume, start by cutting out a piece of fabric with the desired length and width. Then, fold it in half and sew along the edge, leaving one end open. Next, turn the fabric right side out, stuff it with filling, and sew the open end closed.
Finally, attach the tail to your costume using safety pins.
Once you’ve created the basic cat tail for your costume, it’s time to add some personalized touches to make it truly unique. Customizing the tail allows you to show off your creativity and make your costume stand out from the crowd.
Here are a few ideas to help you get started:
Use Additional Fabric Or Accessories To Personalize The Cat Tail Costume.
To give your cat tail costume a personal touch, consider using additional fabrics or accessories. You could use colorful fabric strips to make the tail look more vibrant or add some lace or sequins for a touch of elegance. Additionally, you could attach pom-poms or feathers to the tail for a playful and whimsical look.
Add Stripes, Spots, Or A Bow For Extra Flair.
If you want to give your cat tail costume a more realistic touch, consider adding stripes or spots to imitate a real cat’s tail. You can achieve this by using fabric paint or markers to draw the patterns directly onto the tail. Alternatively, you can use adhesive-backed fabric or felt cutouts in various shapes and sizes to create a unique pattern. To add a cute and feminine touch, you could also attach a bow in a coordinating color to the base of the tail.
Remember, the key to customizing your cat tail costume is to let your creativity shine through. Don’t be afraid to experiment with different colors, patterns, and embellishments to create a tail that perfectly matches your vision. By adding your own personal touch, you’ll turn a simple cat tail into a statement piece that completes your costume and makes you stand out.
Frequently Asked Questions Of How To Make A Cat Tail Costume?
How do I ensure the cat tail costume fits comfortably?
Achieving a comfortable fit for your cat tail costume is essential. Begin by measuring your waist and hips accurately to determine the appropriate size. Consider using an elastic waistband for flexibility, allowing you to move with ease while ensuring the costume stays securely in place.
Can I customize the design of my cat tail costume to match my favorite feline?
Absolutely! Personalizing your cat tail costume is part of the fun. Choose colors and patterns that resonate with your favorite cat, whether it’s a domestic shorthair or a majestic Bengal. Add creative touches such as faux fur or embroidery to capture the unique charm of your chosen feline inspiration.
What materials work best for creating a lifelike cat tail?
For a realistic and comfortable cat tail, opt for soft and fluffy materials like faux fur. Ensure that the fabric is easy to work with and gentle on the skin. Consider wire or stuffing to give your tail structure and shape, making it look more authentic and playful.
How long does it take to make a DIY cat tail costume?
The time required to craft your cat tail costume depends on the complexity of the design and your familiarity with DIY projects. You can complete your cat tail costume over the weekend with a well-thought-out plan and the right materials. Take your time, enjoy the creative process, and marvel at the end result.
What creative embellishments can I add to make my cat tail costume stand out?
Elevate your cat tail costume with creative embellishments! Experiment with ribbons, bows, or even small bells for a touch of whimsy. Consider adding contrasting colors or patterns to make your cat’s tail uniquely yours. Let your imagination run wild as you infuse your personality into this playful feline accessory.
The Last Words
To create a cat tail costume without sewing, follow these simple steps. First, cut out a piece of fabric to your desired tail length and double the width, leaving an inch of seam allowance. Fold it in half lengthwise and sew along the edges, leaving one end open.
Turn it inside out and stuff it with polyester fiberfill. Finally, attach the tail to your costume using safety pins. With this easy DIY method, you can effortlessly make a cat tail costume for any Halloween or dress-up occasion.