To make a unicorn horn for a costume out of styrofoam, you will need a piece of styrofoam and a hot glue gun. Using the hot glue gun, shape the styrofoam into a cone shape and secure it in place.
This will create the base of the unicorn horn.
Materials Needed
Create your own unicorn horn for a costume using styrofoam! Gather styrofoam, a headband, and craft materials to make a magical horn that will complete your costume. Let your creativity soar with this fun and easy DIY project.
To make a unicorn horn for your costume out of styrofoam, you will need the following materials:
Styrofoam Sheet
Scissors
Pencil
Craft Knife
Acrylic Paint
Glitter
Hot Glue Gun
Elastic Or Headband
These materials are readily available and can be found at your local craft store.
First, you will need a styrofoam sheet to create the base of your unicorn horn. The size of the sheet will depend on how big you want your horn to be. You can easily find styrofoam sheets in various sizes at your local craft store or online.
Next, having a pair of scissors and a pencil on hand is essential for marking and cutting the styrofoam. The pencil will allow you to lightly trace the shape of the unicorn horn on the styrofoam sheet, making it easier to cut with the scissors.
For more precise cuts, it’s recommended to have a craft knife as well. This will come in handy when shaping the horn and creating any intricate details.
Once the horn is shaped and cut, it’s time to bring it to life with some color. Acrylic paint in vibrant unicorn-inspired hues is perfect for adding a magical touch to your horn. You can choose colors like pastel pink, purple, or blue, or even go for an iridescent rainbow effect.
To make your unicorn horn truly shine, you’ll need some glitter. Choose the glitter color that complements your paint choice and sprinkle it over the painted surface while it’s still wet. This will create a dazzling finish and make your unicorn horn stand out.
A hot glue gun is an essential tool for assembling your unicorn horn. It will securely attach the different sections together and ensure that your horn stays intact throughout your costume adventure. Make sure to use caution when handling the hot glue gun, as the glue can become very hot.
Finally, you’ll need either elastic or a headband to secure your unicorn horn to your head. Elastic is a great option if you want to wear the horn around your forehead, while a headband can be used to position the horn on top of your head.
With these materials in hand, you’re ready to transform a simple styrofoam sheet into a enchanting unicorn horn for your costume!
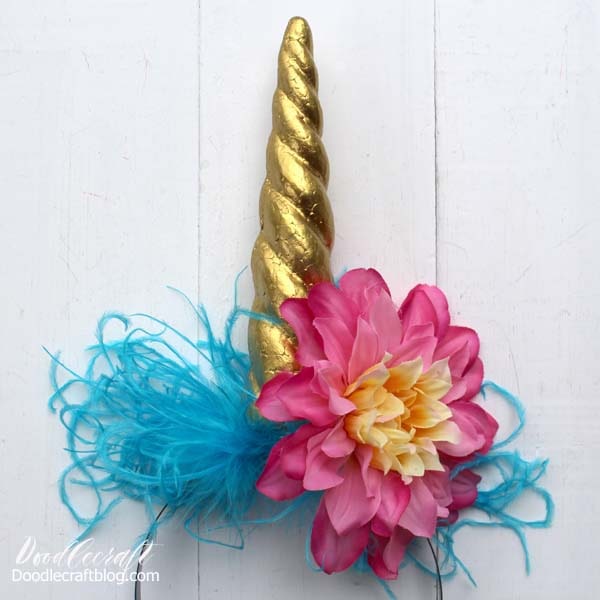
Credit: www.doodlecraftblog.com
Step 1: Planning And Designing
To make a unicorn horn for a costume out of Styrofoam, the first step is planning and designing. This involves creating a template, measuring and cutting the Styrofoam, and shaping it into a cone. Once the cone is formed, it can be decorated and attached to a headband for the finishing touch.
In order to make a unicorn horn out of styrofoam, the first step is to carefully plan and design the shape and size of the horn. This will ensure that you have a clear idea of what you want to create and will make the crafting process much easier.
Measure And Mark The Desired Length
The first thing you need to do is decide on the length of your unicorn horn. Take a styrofoam sheet and using a measuring tape, measure and mark the desired length. Make sure to use a permanent marker or a pen that can be easily seen on the styrofoam.
Sketch The Shape Of The Horn
Once you have marked the length, it’s time to sketch the shape of the unicorn horn on the styrofoam sheet. Use a pencil to lightly outline the shape of the horn. You can refer to pictures or templates for inspiration, but feel free to get creative and design your own unique horn shape.
Use A Craft Knife To Cut Out The Shape
After sketching the shape, it’s time to cut out the unicorn horn from the styrofoam sheet. Take a craft knife and carefully cut along the outline that you sketched. Make sure to cut with precision and be cautious to avoid any accidents. It’s recommended to use a sharp craft knife for clean and smooth cuts.
After completing these steps, you’ll have successfully planned and designed your unicorn horn out of styrofoam. Now you can move on to the next steps of the crafting process and bring your magical unicorn costume to life!
Step 2: Shaping And Smoothing
To shape and smooth a styrofoam unicorn horn for a costume, start by carefully cutting and sanding the foam into a cone shape. Use a fine-grit sandpaper to smooth out any rough edges.
Now that you have your Styrofoam horn template ready (as mentioned in Step 1), it’s time to move on to shaping and smoothing the horn. This step is crucial in achieving a polished and professional-looking unicorn horn for your costume.Use A Craft Knife Or Sandpaper To Smooth The Edges Of The Styrofoam Horn.
To start, you’ll need a craft knife or sandpaper to smooth out any rough edges on the Styrofoam horn. Gently and carefully run the craft knife along the edges, trimming away any excess foam to create clean and defined lines. Alternatively, you can also use sandpaper to smooth out the edges. Remember to exert gentle pressure to avoid damaging the foam.Trim Down Any Rough Or Uneven Areas To Achieve The Desired Shape.
Next, take a closer look at the horn and identify any rough or uneven areas. These imperfections can be easily improved by using a craft knife or sandpaper. Gradually trim down these areas until you achieve the desired shape for your unicorn horn.Remember, take your time during this process and be precise with your cuts or sanding. It’s better to proceed slowly and make gradual adjustments rather than rushing and potentially ruining the horn.By following these steps and using either a craft knife or sandpaper, you can effectively shape and smooth your Styrofoam unicorn horn. This will ensure a professionally crafted horn that will elevate the look of your unicorn costume.Step 3: Adding Texture And Detail
To add texture and detail to your Styrofoam unicorn horn, you can use various materials like glitter, paint, and ribbons. This will give your costume a magical and realistic touch.
Now that you have carved out the basic shape of your unicorn horn using styrofoam, it’s time to add some texture and detail to make it truly magical. This step allows you to unleash your creativity and personalize your unicorn horn. Follow these simple steps to achieve a textured and realistic look.Use A Pencil To Sketch Any Desired Texture Or Pattern On The Styrofoam Horn.
Using a pencil, sketch out the texture or pattern that you want to add to your unicorn horn. This can be anything from scales to swirls or even a wood grain effect. Start by lightly drawing the design on the surface of the styrofoam, taking care not to press too hard and leave indentations.To make it easier to carve out the texture, you can draw the design in sections or use guidelines to keep your lines straight. Don’t worry if your sketch isn’t perfect, as it will serve as a guide for the next step.Use The Craft Knife To Carefully Carve Out The Texture Or Pattern.
Once you’re satisfied with your sketched design, it’s time to bring it to life by carving it into the styrofoam. Take a craft knife and carefully follow the lines of your sketch, gradually cutting deeper into the surface.Remember to use caution and apply gentle pressure to avoid any accidents. Slowly and patiently work your way around the horn, making sure to stay within the lines and create the desired texture or pattern. Take breaks if needed to rest your hand and maintain precision.If you’re going for a more intricate design, you can use a finer craft knife blade or even a small carving tool for more precise details.By adding texture and detail to your styrofoam horn, you elevate it from a simple costume accessory to a visually stunning piece. The carved texture not only adds visual interest but also enhances the overall look and feel of your unicorn horn. So, take your time, be creative, and let your imagination run wild in creating a unicorn horn that truly stands out. Now that you’ve mastered this step, it’s time to move on to the next one and bring your unicorn costume to life!Step 4: Painting And Decorating
Learn how to make a unicorn horn for a costume out of styrofoam with this easy step-by-step guide. Create a unique and magical accessory for your unicorn costume using foam and other materials.
Now that your Styrofoam unicorn horn is shaped and sanded, it’s time to bring it to life with some vibrant colors and decorative elements. Follow these steps to paint and decorate your unicorn horn:
Apply A Base Coat Of Acrylic Paint To The Styrofoam Horn
Start by applying a base coat of acrylic paint to the entire surface of the Styrofoam horn. Choose a color that matches your desired unicorn aesthetic or go for a classic white base. The base coat will provide a smooth surface for additional layers of paint and decorations.
Allow The Paint To Dry Completely Before Adding Additional Layers
It’s important to allow the base coat of paint to dry completely before adding any additional layers. This will ensure that the layers adhere properly and prevent smudging or smearing. Follow the manufacturer’s instructions for drying time.
Add Glitter To The Paint Or Apply A Layer Of Clear Glue And Sprinkle Glitter On Top For A Sparkly Effect
To give your unicorn horn a magical sparkle, you can either mix glitter directly into the acrylic paint or apply a layer of clear glue and sprinkle glitter on top. Both methods will create a beautiful and shimmering effect that will make your unicorn horn stand out.
Decorate The Horn Further With Additional Paint, Gems, Or Ribbons As Desired
Once the base coat and glitter have dried, you can further enhance your unicorn horn by adding additional decorations. Use acrylic paint to add unique patterns, designs, or gradients to make your horn truly one-of-a-kind. Alternatively, you can embellish the horn with gems, rhinestones, or ribbons for an extra touch of glam.
Remember to let each layer of paint or decoration dry completely before applying the next. This will ensure a smooth and professional finish. Once you’ve finished painting and decorating your Styrofoam unicorn horn, you’ll be ready to attach it to a headband or costume and dazzle everyone with your enchanting unicorn transformation.
Step 5: Attaching The Horn To A Headband
Attach the styrofoam unicorn horn to a headband by using hot glue. Begin by gluing the smaller section of the horn in the middle of the headband, then glue the larger section on top.
To complete your unicorn horn costume, it’s time to attach the horn to a headband. This step is crucial for ensuring that the horn stays securely in place while you channel your inner unicorn. Follow these simple steps to attach the horn to a headband using hot glue:Measure And Cut A Piece Of Elastic Or Headband To Fit Comfortably Around The Head.
Before attaching the horn, it’s important to measure and cut a piece of elastic or headband that will fit comfortably around the head. You want the headband to be snug enough to stay in place, but not too tight that it causes discomfort. Take a measuring tape and measure the circumference of the head, then cut the elastic or headband according to that measurement.Attach One End Of The Elastic Or Headband To The Base Of The Styrofoam Horn Using Hot Glue.
Once you have the elastic or headband cut to the appropriate size, it’s time to attach it to the base of the Styrofoam horn. Apply a generous amount of hot glue to one end of the elastic or headband, then firmly press it onto the base of the horn. Make sure to hold it in place for a few seconds to allow the glue to adhere properly.Secure The Elastic Or Headband To The Other End Of The Horn With Hot Glue, Ensuring A Secure Attachment.
To ensure a secure attachment, it’s important to secure the other end of the elastic or headband to the horn as well. Apply hot glue to the other end of the elastic or headband, then press it firmly onto the horn. Hold it in place for a few seconds to allow the glue to dry and create a strong bond.By following these steps, you can easily attach the unicorn horn to a headband using hot glue. This method ensures a secure attachment, allowing you to confidently wear your unicorn horn costume without worrying about it coming loose. Now, you’re one step closer to transforming into a magical unicorn!Frequently Asked Questions For How To Make A Unicorn Horn For Costume Out Of Styrofoam?
How Do You Make A Unicorn Horn Out Of Foam?
To make a unicorn horn out of foam, roll the foam into a cone shape and secure it using hot glue. Attach the foam horn to a headband using hot glue, starting with a smaller foam piece in the middle and a larger piece on top.
How Do You Make A Simple Unicorn Horn?
To make a simple unicorn horn, you will need a piece of thick paper, such as cardstock. Roll the paper into a cone shape and secure it with hot glue. Decorate the horn as desired. Attach the horn to a headband using hot glue.
What Can I Use To Make A Unicorn Horn?
You can make a unicorn horn using thick, heavy weight paper like cardstock or scrapbooking paper. You can also use decorative paper to add uniqueness to your horn.
How Do You Attach A Headband To Styrofoam?
To attach a headband to Styrofoam, use hot glue. First, attach a smaller foam section to the middle of the headband, then add the larger piece on top. Make sure the cut sides are facing down. This will securely hold the headband and Styrofoam together.
Conclusion
Making a unicorn horn for a costume out of styrofoam is a fun and creative project. With the right materials and some easy steps, you can bring your unicorn costume to life. Remember to shape the styrofoam carefully and use hot glue to attach it securely to a headband.
Adding paint and glitter can give your horn a magical touch. Enjoy the process and embrace your inner unicorn!