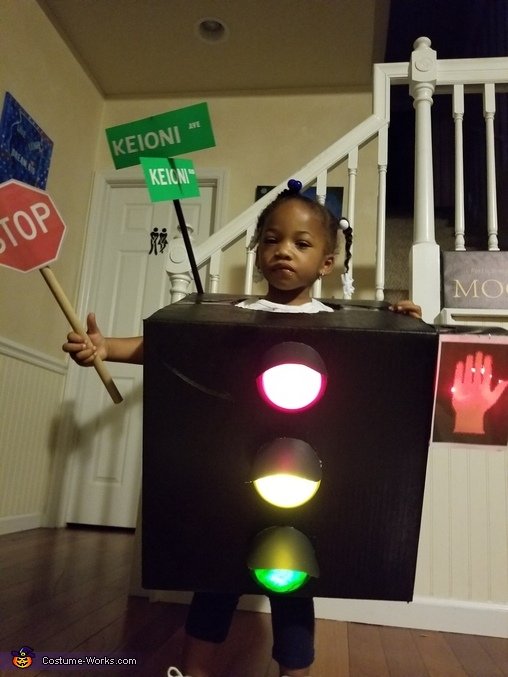
To make a traffic light costume, you can create a paper traffic light by gluing red, yellow, and green circles in a vertical line on a rectangle of black paper. Another option is to trace circles using a jar lid on red, yellow, and green construction paper, cutting out each circle and gluing them to a black rectangle with red on top, yellow in the middle, and green on the bottom.
You can also enhance the costume by adding glow sticks to make it glow in the dark. Get creative with your DIY traffic light costume and shine this Halloween!
Materials Needed
Are you looking for a fun and unique costume idea for Halloween or a fancy dress competition? Look no further than a traffic light costume! Making your own traffic light costume is not only affordable but also allows you to get creative and customize it to your liking. In this section, we will guide you through the materials you will need to create your very own traffic light costume.
Materials Needed:
Creating a traffic light costume requires a few materials that are easy to find and budget-friendly. Here’s a list of the materials you will need:
Cardboard:
- Gather some cardboard boxes or thick cardboard sheets that are large enough to fit your body measurements.
- You can even reuse old cardboard to make this costume more sustainable.
Craft Supplies (paint, Markers, Etc.):
- Acrylic paint or markers in the colors red, yellow, and green are essential for creating the traffic light effect.
- Choose non-toxic paints or markers for safety.
- Add some paintbrushes, sponges, or even your fingertips to apply the paint smoothly.
Scissors:
- Grab a pair of sharp scissors that can easily cut through the cardboard.
- Make sure they are comfortable to hold for an extended period.
Glue:
- A strong adhesive, such as a hot glue gun or craft glue, is necessary to securely attach the painted cardboard pieces together.
- Keep in mind the drying time of the glue you choose.
String Or Elastic:
- String or elastic will be used to create straps or loops for wearing the traffic light costume.
- Elastic bands can be easily adjusted for a comfortable fit.
Now that you have gathered all the necessary materials, you are ready to start making your traffic light costume! The next section will guide you through the step-by-step process of creating this eye-catching costume.

Credit: m.youtube.com
Step 1: Design The Traffic Light
Designing the traffic light for your costume is the first step in creating an eye-catching and realistic Halloween outfit. Follow these instructions to sketch the design of the traffic light on the cardboard:
Sketch The Design Of The Traffic Light On The Cardboard
To start, gather the necessary materials: a large piece of cardboard, a pencil, and a ruler. Find a quiet and well-lit space to work in.
- Measure and mark the dimensions of the traffic light on the cardboard using the ruler. The standard size for a traffic light is about 18 inches in height and 8 inches in width. Adjust the measurements based on your preference.
- Using the pencil, sketch a rectangle shape according to the dimensions you marked earlier. This will serve as the background for the traffic light.
- Next, draw three equal-sized circles vertically inside the rectangle. The top circle will represent the red light, the middle circle will represent the yellow light, and the bottom circle will represent the green light. Make sure the circles are evenly spaced.
- Label each circle with its corresponding color (RED, YELLOW, GREEN) to ensure accuracy when painting later on.
- Finally, trace over the pencil sketch with a marker to make the design more pronounced and visible.
Congratulations! You have successfully sketched the design of the traffic light on the cardboard. The next step is to paint the traffic light using the appropriate colors. Stay tuned for Step 2!
Step 2: Cut Out The Traffic Light
Now, it’s time to bring your traffic light costume to life! Follow these steps to cut out the traffic light shape from the cardboard:
- Start by gathering all the necessary materials. You will need:
- Cardboard
- Scissors
- Pencil
By following these steps, you will be able to create a realistic traffic light shape for your costume. Remember to take your time and be precise with your cuts for the best result. Now that your traffic light shape is complete, it’s time to move on to the next step – adding the finishing touches to your costume!
Step 3: Paint The Traffic Light
After you have cut out the circles for the traffic light, it’s time to paint them with the appropriate colors. Make sure to use bright and vibrant colors to create a realistic traffic light effect. Here’s how you can paint each circle:
Paint Each Circle With The Appropriate Color (red, Yellow, And Green)
- Start by painting the top circle with red paint. This will be the “stop” signal of the traffic light.
- Next, move on to the middle circle and paint it with yellow paint. This will be the “caution” signal.
- Finally, paint the bottom circle with green paint. This will represent the “go” signal.
Ensure that you apply an even coat of paint on each circle, covering the entire surface. Allow the paint to dry completely before moving on to the next step. This will ensure that the colors remain vibrant and don’t smudge or mix.
By painting each circle with the appropriate color, you are bringing the traffic light to life. The bright colors will make your costume stand out and capture the attention of everyone around you. Now that you’ve painted the traffic light, it’s time to move on to the final step of assembling the costume.
Step 4: Add Details
Step 4: Add Details To make a traffic light costume, start by cutting out circles from colored construction paper and gluing them onto a black rectangle. Place the red circle on top, yellow in the middle, and green at the bottom.
Then, attach the costume to make it glow by using glow sticks and tape.
Now that you have your basic traffic light costume structure set up, it’s time to add those finishing touches that will make your costume stand out. Adding extra details like arrows or text can take your traffic light costume to the next level.Use Markers Or Other Craft Supplies To Add Any Additional Details
Once your cardboard boxes are painted and dry, you can use markers or other craft supplies to add any additional details to your traffic light costume. Here are some ideas to consider:1. Arrows: Use markers or colored duct tape to draw arrows pointing in different directions on your traffic light. This adds a realistic touch and makes it clear which way the traffic is flowing.2. Text: Use markers or adhesive letters to write words like “stop”, “go”, or “yield” on your traffic light. This adds an educational element to your costume and reinforces traffic safety.3. Numbers: Add numbers to your traffic light to represent different streets or intersections. This adds a fun and personalized touch to your costume.Ensuring Each H3 Heading Adheres To Html Syntax
Use Markers Or Other Craft Supplies To Add Any Additional Details
Ensuring Each H3 Heading Adheres To Html Syntax
`.Adding these additional details will make your traffic light costume more visually appealing and help you stand out in any costume contest or Halloween party. So grab your markers or craft supplies, and get creative with your traffic light costume!Step 5: Create Straps Or Handles
In Step 5 of making a traffic light costume, you can create straps or handles to easily carry and wear the costume. This will ensure that the costume is secure and comfortable while you enjoy your Halloween festivities.
Once you have completed the construction of your traffic light costume, it’s time to create straps or handles to ensure that you can wear it comfortably. Attach string or elastic to the back of the traffic light to create secure straps or handles. This will allow you to easily put on and take off the costume without any hassle.There are several options you can choose from when creating the straps or handles. One option is to use a strong string that can be tied around your shoulders like a backpack. If you prefer a more secure fit, you can opt for elastic bands that can be stretched around your shoulders and chest.To attach the string or elastic to the costume, follow these simple steps:- Measure and cut the string or elastic to the desired length. Make sure it is long enough to comfortably fit around your shoulders or chest.
- Sew or glue one end of the string or elastic to the back of the traffic light costume. Take care to securely fasten it in place to ensure that it won’t come loose while you’re wearing the costume.
- Repeat the process for the other end of the string or elastic, ensuring that it is evenly spaced and securely attached.
Step 6: Put On The Costume
Now that your traffic light costume is complete, it’s time to put it on and rock the party! Follow these simple instructions to ensure a comfortable fit:
Put Your Arms Through The Straps Or Handles And Adjust For A Comfortable Fit
Begin by locating the straps or handles on your traffic light costume. These are typically located on the sides or top of the costume. Gently slide your arms through them and adjust the straps or handles for a comfortable fit. Make sure they are not too tight or too loose, ensuring you can move around freely without any discomfort.
Make Sure The Traffic Light Is Positioned In Front Of Your Body
Once you have put your arms through the straps or handles, position the traffic light in front of your body. This ensures that the lights are visible and creates a realistic effect. Adjust the costume as needed to ensure the traffic light is centered and positioned correctly.
And that’s it! You’re now ready to show off your creative and attention-grabbing traffic light costume. Remember to have fun and be safe while wearing your costume at events or parties. Now go out there and light up the night!
Frequently Asked Questions Of How To Make A Traffic Light Costume?
How To Make Your Own Traffic Lights?
To make your own traffic lights, follow these steps: 1. Cut out red, yellow, and green circles from construction paper. 2. Glue the circles in a vertical line on a black rectangle. 3. Discuss how traffic lights help drivers. 4.
Sing a song about traffic lights. 5. Tape glow sticks to a shirt for a glowing costume.
How To Make A Traffic Light With Children?
To make a traffic light with children, glue red, yellow, and green circles on a black rectangle of paper. Discuss what children know about traffic lights and their purpose. Ask questions about how they help drivers. You can also sing the “Traffic Light” song for an interactive activity.
How Do You Make A Stop Light For Kids?
To make a stop light for kids, trace and cut out circles of red, yellow, and green construction paper. Glue the circles in a vertical line on a black rectangle, with red on top, yellow in the middle, and green on the bottom.
This simple craft can help children learn about traffic lights.
How Do You Make A Costume Glow?
To make a costume glow, tape glow sticks to the shirt and connect them until they stretch across the chest. Attach the torso, legs, and head, and then activate the glow sticks.
Conclusion
To make a traffic light costume, follow these simple steps and get ready to turn heads at your next Halloween party or dress-up event. First, gather your materials, which include a black cardboard box, red, yellow, and green construction paper, scissors, and glue.
Next, cut out circles from the construction paper and glue them in a vertical line on the front of the cardboard box. Finally, put on the costume and get ready to be the life of the party as you light up the night as a traffic light! Now you know how to make a traffic light costume that is sure to impress.
Happy crafting!