Ever wondered how to unleash your inner Bowser and make a striking entrance at your next costume event? If the idea of crafting a Bowser costume has crossed your mind, you’re in for an exciting journey.
To make a Bowser costume, you will need a Bowser shell, which can be created using materials like cardboard or foam. Use red, yellow, and brown fabric to make a Bowser-themed jumpsuit.
At CatchyCostume, we’re here to guide you through the process with our expertise in creating the iconic Bowser ensemble.
Transforming into the formidable villain of the Mushroom Kingdom isn’t just about sewing fabric; it’s about capturing the essence of Bowser’s fierce and imposing presence.
Join us as we delve into the details, offering tips, tricks, and creative insights to help you craft a Bowser costume that commands attention and admiration.
Let’s dive into the world of costume craftsmanship and make your Bowser transformation a legendary success.
How To Make A Bowser Costume: Materials Needed
Making your own Bowser costume requires a few key materials that are easy to find. Gather the following items before you begin:
Cardboard
Cardboard will serve as the base for creating the iconic shape of Bowser. Look for sturdy, large pieces of cardboard that can be cut and shaped to form the costume.
Paint
To bring Bowser to life, you’ll need to paint in various colors. Choose shades that match Bowser’s color scheme, including green, yellow, and red. Don’t forget black paint to add details and depth.
Glue
Strong glue, such as craft glue or hot glue, will be necessary to attach different pieces together. A good adhesive will ensure that your costume stays intact throughout the day.
Scissors
A pair of sharp scissors will come in handy for cutting cardboard, foam, and fabric. Make sure your scissors are sturdy and capable of cutting through thicker materials.
Elastic
Elastic bands or cords will be used to secure the costume to your body. Elastic will allow for flexibility and comfort while wearing the Bowser costume.
Foam
Foam is a versatile material that can be used to add padding, structure, and dimension to your Bowser costume. Look for foam sheets or blocks that can be easily cut and shaped.
Hot Glue Gun
A hot glue gun is an essential tool for securely attaching foam pieces and other materials. Make sure to handle the hot glue gun with care to avoid burns.
Fabric
Select fabric in the colors required for Bowser’s clothing, such as yellow for the belly and white for the spikes on his back. You may also need extra fabric for details like the collar or cuffs.
Velcro
Velcro strips or dots are useful for fastening certain parts of the costume, such as the back closure or detachable elements. It allows for easy removal and adjustment.
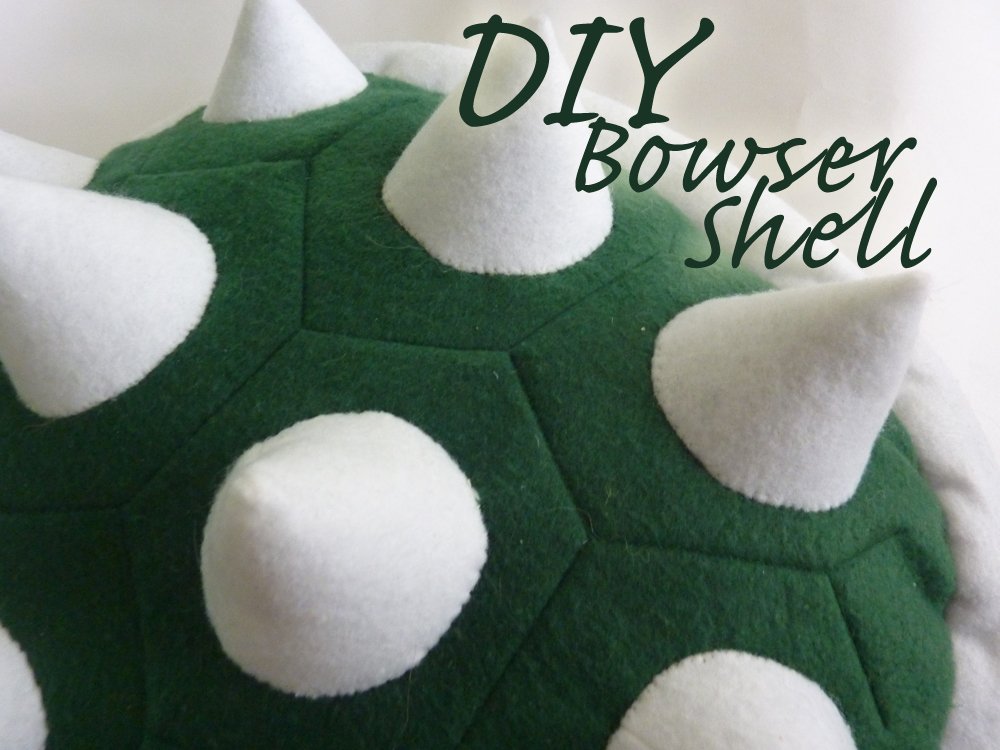
Creating The Bowser Shell
Learn how to create the iconic Bowser shell for your Bowser costume in this easy DIY tutorial. No sewing is required, just a few supplies and some creativity. Stand out at your next Halloween party with this homemade Bowser costume.
Creating The Bowser Shell |
Are you a fan of Super Mario and want to dress up as the iconic villain, Bowser, this Halloween? Creating a Bowser costume is easier than you may think, and the centerpiece of the costume is the Bowser shell. With some simple materials and a little creativity, you can make a Bowser shell that looks just like the real thing. In this post, we’ll guide you through the process of creating the Bowser shell step by step. |
Measure And Cut The Cardboard To Create The Shell Shape |
To start, you’ll need a large piece of cardboard. Measure and cut the cardboard into a shape resembling Bowser’s shell. It should be round with several distinct spikes around the edges. Use a pencil to mark the outline of the shell on the cardboard, and then carefully cut along the lines using a pair of scissors or a utility knife. |
Paint The Cardboard To Resemble Bowser’s Shell |
Once the shell shape is cut out, it’s time to bring it to life with some paint. Choose a dark shade of green as the base color, as this closely matches Bowser’s shell. Using a paintbrush or sponge, apply an even coat of green paint to the entire cardboard shell, making sure to cover both the front and back.
After the base coat of green paint has dried, it’s time to add some dimension to the shell. Use a lighter shade of green to create some highlights and shadows by lightly dabbing the paintbrush or sponge on the raised areas of the shell. This will give it a more realistic and textured appearance. |
Add Texture And Details Using Paint And Foam |
To make the Bowser shell look even more authentic, you can add texture and details using paint and foam. Use a darker shade of green paint to create scale-like patterns on the shell. Dip a small brush into the paint and lightly flick it onto the shell, creating a mottled effect.
In addition to the painted textures, you can also use foam to add physical texture and dimension to the shell. Cut small pieces of foam into triangular shapes to resemble spikes, and then glue them onto the shell using a hot glue gun. This will make the shell appear more three-dimensional and realistic. |
Attach Elastic Straps To Secure The Shell To Your Body |
Finally, you’ll want to attach elastic straps to the back of the shell to secure it to your body. Measure and cut two elastic lengths, ensuring they are long enough to fit around your chest and shoulders comfortably. Use a stapler or a needle and thread to attach one end of each elastic strap to the top corners of the shell.
Try on the shell and adjust the straps as necessary to ensure a snug and secure fit.
Once you’re happy with the positioning, secure the other ends of the elastic straps to the bottom corners of the shell. This will allow you to easily put on and take off the Bowser shell without it shifting or falling off. |
Making The Bowser Headpiece
Creating a realistic Bowser headpiece is a crucial step in making a Bowser costume that truly captures the essence of this iconic character.
In this section, we will guide you through the process of making a headpiece that resembles Bowser’s head, complete with all the intricate details.
Create A Base For The Headpiece Using Foam And Cardboard
Before you start adding the details, you’ll need to create a base for the headpiece using foam and cardboard. This will give the headpiece structure and allow it to sit comfortably on your head. Here’s how you can do it:
- Measure the circumference of your head and cut a piece of foam to match that size. This will serve as the base of the headpiece.
- Attach the foam to a sturdy piece of cardboard using a hot glue gun. This will provide stability to the headpiece and ensure it stays in shape while you work on it.
- Shape the foam and cardboard into Bowser’s iconic head shape. Use reference images for accuracy and make sure to leave enough room for your face to fit inside the headpiece.
- Trim any excess foam or cardboard and sand the edges to smooth them out. This will prevent any rough edges from causing discomfort when you wear the headpiece.
Paint And Add Details To Resemble Bowser’s Head
Now that you have the base of the headpiece, it’s time to bring Bowser’s head to life. Follow these steps to paint and add the details:
- Start by applying a base coat of paint that matches the color of Bowser’s skin. You can use acrylic paint for this step. Apply multiple layers if necessary to achieve solid coverage.
- Once the base coat is dry, use a smaller brush to add details such as scales, horns, and eyes. Refer to reference images to accurately recreate Bowser’s facial features.
- Use different shades of paint to add depth and dimension to the headpiece. Shadows and highlights will make it look more realistic and add a professional touch.
- Allow the paint to dry completely before moving on to the next step.
Attach Elastic Or A Headband To Keep The Headpiece In Place
You’ll need to attach elastic or a headband to ensure that the headpiece stays securely in place while you wear it. Here’s how you can do it:
- If you choose to use elastic, measure the circumference of your head and cut a piece of elastic to match that size. Attach the elastic to both sides of the headpiece using a hot glue gun, making sure it’s tight enough to hold the headpiece in place but not too tight to cause discomfort.
- If you prefer to use a headband, simply attach it to the base of the headpiece using hot glue or adhesive Velcro strips. Make sure the headband is wide enough to provide sufficient support.
- Try on the headpiece and adjust the elastic or headband as needed for a comfortable fit. You should be able to move your head freely without the headpiece slipping or causing any discomfort.
With the headpiece complete, you are one step closer to achieving the perfect Bowser costume. Now you can move on to other elements, such as the body, tail, and shell, to complete your transformation into the iconic villain of the Mushroom Kingdom.
Crafting The Bowser Tail
When it comes to creating a Bowser costume, one of the most important elements is the tail. The tail is what completes the iconic look of Bowser, the menacing turtle-like antagonist from the Super Mario Bros. franchise.
In this section, we will guide you through the process of crafting a Bowser tail that will truly make your costume stand out.
Use Cardboard Or Foam To Create The Tail Shape
To start, you will need either cardboard or foam to create the base shape of Bowser’s tail. Both materials are flexible and easy to work with, so choose the one that you feel most comfortable using.
- Begin by sketching the shape of the tail on the cardboard or foam. Bowser’s tail is typically long and curved, with spikes or ridges along its length. Use a reference image to ensure accuracy.
- Once you are satisfied with the shape, carefully cut it out using a sharp utility knife or scissors. Take your time to ensure clean and precise cuts.
- If you are using cardboard, you may want to reinforce the tail by gluing multiple layers together. This will make it more sturdy and durable.
Paint And Add Details To Mimic Bowser’s Tail
Now that you have the basic shape of the tail, it’s time to bring it to life by adding color and details that mimic Bowser’s tail.
- Start by applying a base coat of green paint to the entire tail. Use a paintbrush or spray paint for a smooth and even finish.
- Next, using a darker shade of green or brown paint, add shading and texture to create a scaly appearance. Focus on the ridges and spikes of the tail, as these areas will give it a more realistic look.
- You can also use a lighter shade of green or yellow to highlight the edges of the ridges and spikes, adding depth and dimension.
- Once the paint has dried, seal the surface with a clear varnish or sealant to protect the paint and give the tail a glossy finish.
Attach Elastic Or A Belt To Secure The Tail To Your Waist
Lastly, you will need a way to securely attach the tail to your waist, so it stays in place throughout the festivities.
- If you prefer a more comfortable and adjustable option, you can attach elastic to the base of the tail. Measure the elastic to fit around your waist, leaving a bit of extra length for flexibility.
- Sew or glue the ends of the elastic to the tail, making sure it is securely attached.
- If you prefer a more secure and stable option, you can attach a belt to the base of the tail using hot glue or small screws. This will ensure that the tail stays in place and doesn’t slip or sag.
With your Bowser tail complete, you are now ready to assemble the rest of your Bowser costume and transform into the fearsome king of the Koopas. Remember to have fun and embrace your inner Bowser as you bring this beloved video game character to life!
Assembling The Rest Of The Costume
To assemble the rest of the Bowser costume, you can make a shell using materials such as foam or cardboard, paint it in Bowser’s signature colors, and attach straps to secure it to your back. Additionally, you can create spikes using craft foam and attach them to a headband or hat to complete the look.
Create Or Purchase A Bowser-themed Shirt Or Bodysuit
If you want to complete your Bowser costume, you’ll need a Bowser-themed shirt or bodysuit. You have a couple of options when it comes to getting this essential piece. One option is to create your own shirt using a plain t-shirt and fabric paint or iron-on transfers.
Another option is to purchase a ready-made Bowser-themed shirt or bodysuit from a costume store or online retailer. Make sure to choose a design that captures Bowser’s iconic look, with his spikey shell and menacing expression. You’ll instantly transform into the king of the Koopas with the right shirt or bodysuit.
Find Or Make Bowser-inspired Pants Or Leggings
To complete your Bowser costume, you’ll need the perfect pair of pants or leggings. Look for pants or leggings in colors that match Bowser’s appearance, such as green or brown. You can search for Bowser-inspired pants at costume stores or online retailers.
Another option is to create your own Bowser-inspired pants by using fabric paint or appliqué to add details like scales or spikes.
If you’re feeling crafty, you could even sew fabric panels onto a pair of plain pants or leggings to create Bowser’s distinctive look.
Whichever option you choose, make sure your pants or leggings are comfortable and allow for easy movement, so you can fully embody the character of Bowser.
Use Fabric To Create Bowser’s Spiked Cuffs And Collar
To add the finishing touches to your Bowser costume, you’ll need to create Bowser’s spiked cuffs and collar. Start by selecting a sturdy fabric in a color that matches Bowser’s appearance, such as green or brown.
Cut the fabric into strips, and fold each strip in a zigzag pattern to create the spikes. Sew or glue the spikes onto an existing pair of cuffs and collar, or create your own using fabric or foam.
Alternatively, you can purchase pre-made spiked cuffs and collars from craft stores or online retailers. Whichever method you choose, make sure the spikes are securely attached to the cuffs and collar for durability during wear.
Attach Velcro To The Cuffs And Collar For Easy Wearability
To ensure your Bowser costume is easy to put on and take off, attach Velcro to the cuffs and collar. Sew or glue a strip of Velcro onto each end of the cuffs and collar, making sure the strips align so they can securely fasten together.
Velcro is a convenient option because it allows for easy adjustability and provides a secure hold, making it simple to put on and remove your Bowser costume as needed.
Plus, Velcro doesn’t require any special tools or sewing skills, making it a beginner-friendly option for attaching the cuffs and collar. With Velcro in place, you’ll be able to easily don your Bowser costume and unleash your inner king of the Koopas.
Completing The Look
Once you’ve assembled your Bowser costume with the right attire and accessories, it’s time to complete the look and embody the character. Paying attention to the finer details, such as your face, hair, and footwear, will take your Bowser costume to the next level.
Paint Your Face Or Wear A Bowser-inspired Mask
One way to achieve a true Bowser look is by painting your face to resemble his iconic features. Using face paint in shades of green and yellow, outline and fill in the shape of Bowser’s menacing grin, complete with sharp teeth.
Add in smaller details like his large, angry eyebrows and scaly texture to give your face that authentic reptilian look.
If painting your face isn’t your thing, you can opt for a Bowser-inspired mask instead. Look for a mask with the same ferocious expression and scale-like texture to instantly transform into the King of the Koopas. Just make sure the mask is comfortable to wear for extended periods so you can fully embrace Bowser’s character.
Style Your Hair To Resemble Bowser’s Hair
Bowser is known for his fiery red hair, so styling your own hair to resemble his iconic mane is an important step in completing the Bowser look.
If you have long hair, consider using a hairstyling gel to create spikes or a messy, wild look that mimics Bowser’s untamed hair. If you have shorter hair, you can still achieve a Bowser-inspired look by using hair color spray or temporary hair dye to add touches of red to your style.
Put On Bowser-themed Shoes Or Boots
Don’t forget to pay attention to your footwear when completing your Bowser costume. Look for Bowser-themed shoes or boots that match his color palette and aesthetic.
Choose footwear that features spikes or a rugged design to mimic Bowser’s tough and formidable image. Not only will this detail enhance the authenticity of your costume, but it will also make you feel more like the ultimate villain.
Have Fun And Embody Bowser’s Character While Wearing The Costume!
Remember, the most important part of wearing a Bowser costume is to have fun and truly embody the character. Bowser is fierce, confident, and powerful, so embrace those qualities as you wear your costume.
Practice his signature poses and gestures, and don’t forget to unleash your best villainous laugh. By fully embracing Bowser’s character, you’ll bring your costume to life and make a lasting impression.

Credit: www.instructables.com
Frequently Asked Questions For How To Make A Bowser Costume?
What materials do I need to make a Bowser costume?
Creating a Bowser costume requires specific materials to capture the essence of this iconic character. Start with green or orange fabric for the body, spikes, and shell. Additional materials include a hooded sweatshirt, matching pants, and felt or foam for details like claws and spikes. Gather sewing supplies such as needles and thread, or opt for fabric glue for a no-sew option. Accessories like a plush tail and a lightweight headpiece can complete the Bowser look.
How can I make Bowser’s iconic shell for my costume?
Bowser’s shell is a distinctive feature, and crafting it authentically is crucial. Cut a large oval shape from green or orange fabric for the main shell, and add smaller, symmetrical shapes for the spikes. Attach these pieces to the back of the hoodie or a separate shell base using sewing or fabric glue. Consider using foam or stuffing to give the shell dimension. The result will be a recognizable and impressive Bowser shell.
Can I make a Bowser costume without advanced crafting skills?
Absolutely! Crafting a Bowser costume is achievable for all skill levels. Utilize fabric glue for attaching fabric pieces if sewing seems daunting. Consider repurposing existing clothing items, like a green hoodie and pants, to simplify the process. Pre-made spikes and accessories are often available, making it easy to assemble a convincing Bowser costume without advanced crafting skills.
How can I ensure my Bowser costume is comfortable for extended wear?
Comfort is key for a successful costume, especially if worn for an extended period. Choose comfortable, breathable fabrics for the main body to prevent overheating. Ensure that the headpiece allows for proper ventilation and visibility. If incorporating a shell, keep it lightweight to avoid discomfort. Perform trial wear to identify any potential issues and make necessary adjustments for maximum comfort during extended use.
Are there creative touches to enhance my Bowser costume?
Absolutely! Add creative touches to make your Bowser costume stand out. Consider using fabric or craft paint to add details like scales or texture to the body. Enhance the headpiece with menacing facial features, and use makeup or face paint for a finishing touch. Personalize your Bowser costume with small accessories like a spiked collar or wristbands for an extra dose of character. Let your creativity shine to make your Bowser costume uniquely yours.
The Last Words
To create a Bowser costume, follow these steps: Gather materials like a green jumpsuit, craft foam, and hot glue. Cut out pieces for Bowser’s shell and spikes. Attach the spikes to the shell using hot glue. Add detailing with paint or felt.
Complete the look with Bowser’s accessories like a headpiece and cuffs. And there you have it – a homemade Bowser costume that is sure to impress! Now you’re ready to stomp into your next Halloween party as the King Koopa himself.